Creating Instant PowerPoint Slides From WorshipTeam.com

One the great features of Worshipteam.com is its ability to generate instant Powerpoint slides for you of the set of songs you desire. While many churches are using display presentation software to enhance their worship, Powerpoint is still the number 1 choice as the method of displaying lyrics and sermon notes in churches. Obviously this is due to relative low cost and familiarity of the software for local churches and their staffs. That said, if you are using Powerpoint in your services, Worshipteam.com is here to make your job as easy as one (1) single click.

Here is the simple method of creating those Powerpoints, pre-formatted and ready to roll for Sunday morning.

1. Login to Worshipteam.com. Find the set that you wish to create a Powerpoint presentation of. You should see the set player like as below here:

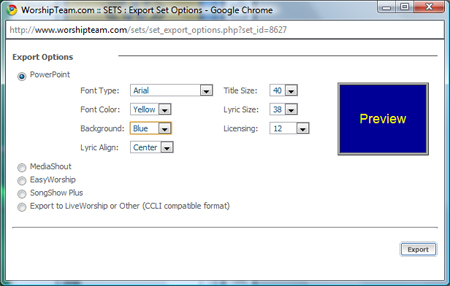
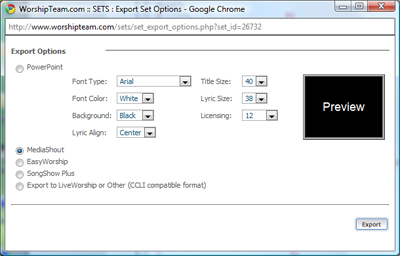
2. Select the “Export” button at the top right portion of the set player. This will launch the “Export Options” dialog. You will see the export dialog as shown here :

3. In my example, I chose “Yellow” font and “Blue” background. I left the other options defaulted. You can choose whatever you would like for the options. Click the “Export” button on the lower right. A Powerpoint file (PPT file type) will be downloaded to your computer.

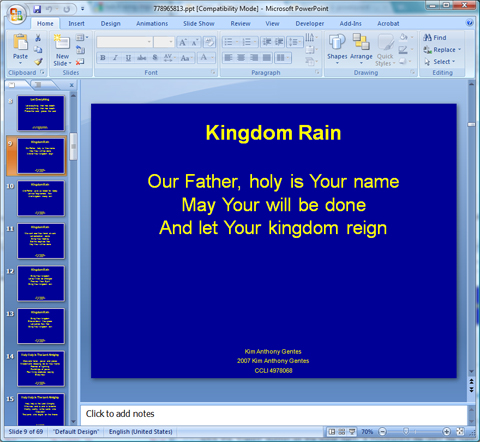
4. Open the file and view your Worshipteam.com set that has been made into a basic Powerpoint presentation. It should look good and be formatted with good lyric breaks similar to below:

Customize the presentation according to your local church needs and use. The goal of the Powerpoint presentation generator in Worshipteam.com is to make quick Powerpoints for you, that you can customize or use as you wish. The songs will be ordered in the same order you have them in the set, and each song will have its song sections ordered in the same way you arranged that song, allowing you to move straight forward through the presentation, as long as your song arrangement matches the way you want the lyrics presented to your congregation.

Blessings
Kim Gentes

Worshipteam.com

WorshipTeam.com Songs Access for EasyWorship Users

EasyWorship is one the simpler display software choices available for churches. It provides many good basic functions without a lot of power-tools for advanced media and display. EasyWorship users can access Worshipteam.com songs in two different ways.

OPTION 1 is available to EasyWorship users who want to import songs from Worshipteam.com and edit them one at a time to customize the song as they import it.

OPTION 2 is available to EasyWorship users who want to import an entire group of songs from Worshipteam.com and batch process them into their EasyWorship database.

Each of the above options are explained below, depending what your situation is.

Before discussing each option for EasyWorship, you should understand that EasyWorship does not have an import that allows you to bring in multiple songs directly with its main program. In the EasyWorship program itself it does allow you to import one song at a time via the EasyWorship “New Song” function (this is discussed below as “OPTION 1”). However, you can import multiple songs outside of the main program, if you have their *EZconverter* utility to import batches of songs (this is discussed below as “OPTION 2”). EasyWorship also hides their database converter from users and you must personally request it to get it. Because they hide this from users, don’t support importing inside the main program and don’t officially support the importer program, their song database functions are least useful of all of the song display programs.

That said, we provide a lot of good information here on a couple straightforward methods for getting your worshipteam.com songs into EasyWorship.

Exporting your songs from Worshipteam.com — Regardless of how you want to import the songs in EasyWorship (either OPTION 1 or 2), exporting the set of songs from Worshipteam.com is the same. Here is how your export your songs from WorshipTeam.com for EasyWorship use:

  1. Log into Worshipteam.com and go to view any set you wish to export (including all the songs in the set) to EastyWorship.
  2. Select the “Export” icon from the icons at the top of the set.
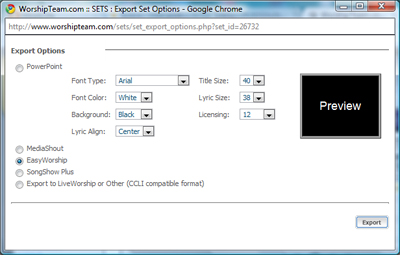
  3. A dialog will appear for exporting. Select the “EastyWorship” radio option, and click “Export” button.
  4. Worshipteam.com will generate a ZIP file of your set of songs. Save that ZIP file where you can find it.
  5. Go the ZIP file and extract the contents of it (several files) into a folder that only contains those files (nothing else). This will make it simple to know what songs you are importing, and it won’t confuse the EasyWorship song importer (OPTION 2), which will import every song it sees in a directory.

Your songs are now exported from Worshipteam.com and are ready for EasyWorship to import them.

There are two options you now have to import the songs into EasyWorship:

OPTION 1. Import single songs into EasyWorship— In this scenario, you will import songs from Worshipteam.com, one at a time, into Easy Worship. Here is how that works:

  1. Open the EasyWorship program.
  2. Select the “Songs>New Song” option from the command menu.
  3. This will bring up the “New Song” dialog.
  4. On that dialog, select the “Import new song” button to the right of the Song Title field (next to the I-info button).
  5. When you select that button, browse to the location of your songs. And choose the song you wish to import.
  6. The song will be loaded and you can review it and click OK when done.
  7. Do this with each new song you want import into EasyWorship.

OPTION 2. Batch Import a lot of songs into EasyWorship

Before Batch Importing songs into EasyWorship You Must Acquire the song database importer for EasyWorship. You can get the EasyWorship ezConvert program from EasyWorship technical support directly. NOTE: they did not provide this by default to all their users. You must request it directly from them, which they communicate here:
http://www.easyworship.com/support/kb/index.php?ToDo=view&questId=97&catId=2

It is also found online as well at :

http://www.onlinemmi.com/eyedrops/EasyWorship/EZconvert.htm

where a user describes how it operates. (some good information there). Once you have the ezConvert.exe program from EasyWorship, follow the steps below and import the songs into EasyWorship.

  1. Make sure EasyWorship main program is CLOSED (shut down).
  2. Launch the ezConvert.exe program you acquired. (you may get a security warning, select RUN if asked)
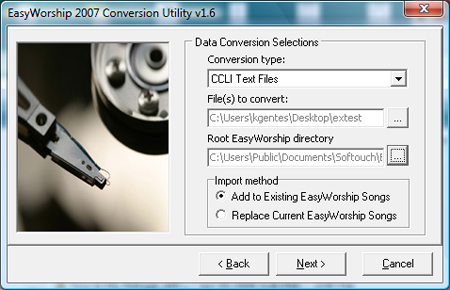
  3. You will get a EasyWorship Conversion Utility (we have tested version v1.6 of the utility and it worked on both EasyWorship 2007 and EasyWorship 2009). Click “Next” on the first screen of the converter wizard.
  4. On the second screen, select “CCLI Text Files” as the “Conversion type:”.
  5. Browse to the directory that contains your song files by selecting the “…” button next to the “File(s) to convert:” field.
  6. Browse to the directory that contains EasyWorship database files by selecting the “…” button next to the “Root EasyWorship directory” field. You want to select a directory that contains a “data” directory itself. It might be something like “C:\Users\Public\Documents\Softouch\EasyWorship\Default\Databases”, depending on your computer configuration. You should see the options looking similar to below
  1. Select “Next” and the songs in the directory will be imported into the EasyWorship database.
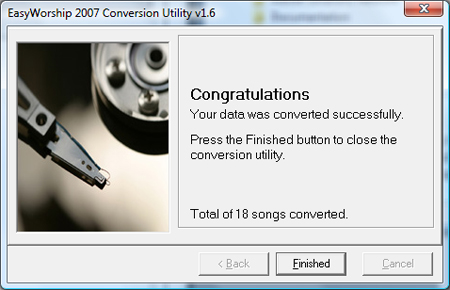
  2. Once the program is done it will tell you how many songs it processed.

You should now be able to open up EasyWorship and see all the songs you exported from Worshipteam.com in the EasyWorship song database.

No matter what display presentation software you are going to use, exporting the songs from Worshipteam.com is easy and quick. Unfortunately, despite its name, importing songs into EasyWorship is not as straightforward as other presentation software programs. However, once you have them in the database, you should be ready to create your presentations in EasyWorship.

Blessings
Kim Gentes

Worshipteam.com
Mediashout’s Quick Access to Your WorshipTeam.com Songs

MediaShout Presentation Software is the premier display software for churches, available in more congregations than any other presentation software. Mediashout users can access Worshipteam.com songs in two different ways.

OPTION 1 is available to Mediashout users from version 2.5 to present. Use that method if you have anything other than Version 4 of Mediashout, or if you don’t want to import your Worshipteam.com sets directly with Mediashouts song library.

OPTION 2 is available only for Mediashout 4 users. You can directly access your Worshipteam.com sets and import the songs without ever leaving Mediashout. This requires one of your Mediashout computers to have direct access to the internet, so that Mediashout can synch with your WorshipTeam.com account and access your songs instantly for use in your Mediashout presentations.

Each of the above options are explained below, depending what your situation is.


OPTION 1: Export from WorshipTeam.com to the Mediashout Song file format– the grand-poobah of presentation software, Mediashout has the most developed feature set and powerful display options of all the software. They have also created two seamless methods of getting song content into their presentation database and scripts. The first method is to import their custom song file format. Worshipteam.com supports this easily as follows:

  1. Simply log into Worshipteam.com and go to view any set you wish to export (including all the songs in the set) to Mediashout.
  2. Select the “Export” icon from the icons at the top of the set.
  3. A dialog will appear for exporting. Select the “Mediashout” radio option, and click “Export” button.
  4. Worshipteam.com will generate a file of your set that is in a compatible import file for Mediashout. Save that file where you can find it from Mediashout.

Import the Mediashout Song file format to Mediashout-

  1. Open Mediashout.
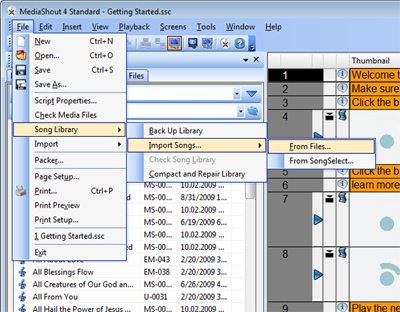
  2. Select “Song Library>Import Songs>From Files”
  3. Choose the “Song deck text file” source file type. Click Next.
  4. On the Import Songs dialog, select the folder icon and browse to your text file you just downloaded from worshipteam.com (above). Select the file and click Open. Back on the Import Songs dialog, click Next.
  5. Now the songs are ready to be imported. Choose either “Import All Songs” of “Skip Duplicates”. You can also choose to group the songs according to your preferences.
  6. When you are ready, click “Import”.
  7. Once you being importing, the file will be processed into a results screen. Review the results and click “Close”.
    You will now find your songs in your Mediashout song library!

OPTION 2: Mediashout Online Set Import– Mediashout and Worshipteam.com engineers worked together to provide a direct online song import function that requires no saving of files, just selecting the set you developed in Worshipteam.com and importing it to your Mediashout database. This features is completely embedded in Mediashout 4 and beyond (Mediashout 3.5+ and earlier should use the song file import method described above). Below are the details on using Worshipteam.com sets inside of Mediashout as of Mediashout version 4. Please check with your Mediashout documentation for more details on this great, time saving feature.

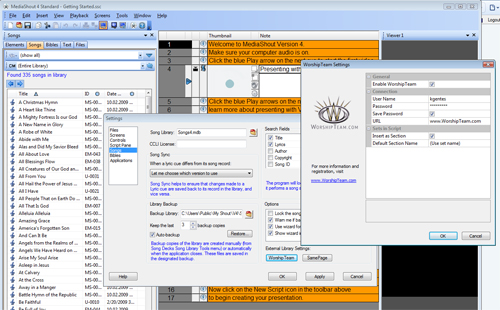
Before adding songs from WorshipTeam.com, you must have it enabled and configured in the song settings. Do this once, and you don’t have to do it again. Here is how to configure Mediashout for your Worshipteam.com account:

  1. Select “Tools>Settings…” and you will have the Settings dialog appear.
  2. Select the “Songs” option the left and the screen will change to adjust your songs settings.
  3. Select the button called “WorshipTeam” under “External Library Settings”. This will bring up the Worshipteam.com Settings dialog.
  4. Select the “Enable WorshipTeam” checkbox. Fill our the user name/password information.
  5. Once you have configured the options as you like them, select OK. You now are ready to use Worshipteam.com in Mediashout.

To retrieve a WorshipTeam song set, follow these steps:

  1. Open MediaShout, and then click the Songs tab to open a song deck.
  2. Click the CM button, and then click WorshipTeam.
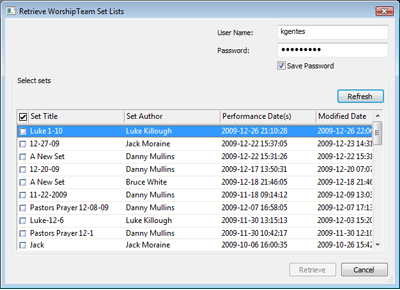
  3. Click the WT button, and then click Retrieve Sets.
  4. Select the set to import.
  5. Once the set list is retrieved, link each song to a song in the library, or if the song is not already in the library, create a new song.

Take a look at which option works best for you and your church and enjoy the power of Worshipteam.com songs in your Mediashout display presentations.

Blessings!
Kim Gentes
WorshipTeam.com

New Practice Pad Options

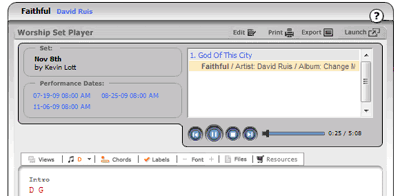
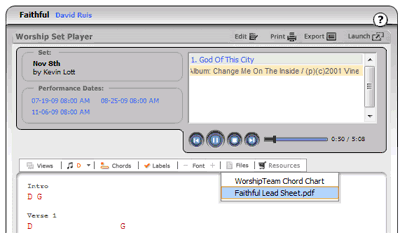
We are excited to bring new options to the WorshipTeam.com Practice Pad! The Views, Key, Files and Resources Menus are now available while listening to your set.

Custom Views and Files are now easily accessible to you and your team members while practicing! This can be very helpful if team members need different views of the same song.

Guitar Players will be able to instantly switch to a Capo Chart by simply changing the key.

Audio Now Available on WT Mobile!

“Will there ever come a time when we can play the set on a mobile device?”

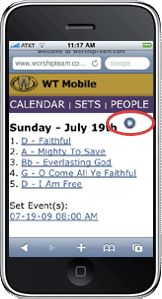
YES – The time has come! We have heard loud and clear from our customers the need to play their sets while away from their computers. Now when viewing your set, or a song within your set, you will see a Play button on WT Mobile. Simply click the play button and within a few moments it will be “music to your ears”.

Windows Mobile users will be prompted to install the music player from the WT Mobile login screen. iPhones, iTouches and Blackberries work without any additional software or configuration.

Aside from the obvious benefit of mobile access as you are traveling, in your car or at the office, WT Mobile audio means that most teams no longer need to worry about burning CDs, downloading mp3s or audio files and such. Most mobile devices have stereo mini-jacks/ports that can feed into a church sound system, an audio docking station (such as iHome etc), car or home stereos. Your audio is now portable and you can practice with it, listen to it, and take it with you as far as your mobile connection can go. This is a wonderful advantage for worship teams, musicians and worship leaders. And it is all legal and completely included with your Worshipteam.com subscription at no extra cost, meaning you don’t have to worry about additional purchasing of licensing or listening resources for your team to have access to audio.

“Getting Started with WorshipTeam.com” – a tour of the site for the new administrator

We have added a video that browses through the 6 main sections of the Worshipteam.com and allows new planners/administrators the opportunity to get a few minutes of seeing the power of the new service. The video is available from the dashboard when you login, and is below:
[video:youtube:TkI1wAmpTaM]
We hope it helps give you a good overview of the deep functionality in Worshipteam.com

New Set Builder/Planner Goes live

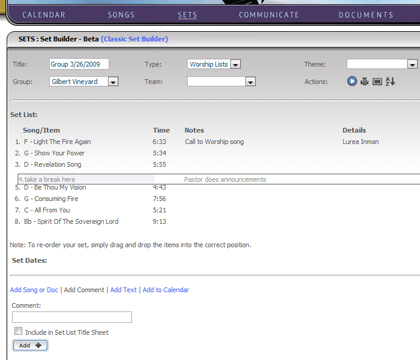
We just added a new, drag and drop, user friendly set builder. When you click to edit a set now, you will see your songs and items in your set. Each song listing (or field of information) will be editable by simply double-clicking into the information you wish to change. If you want to change the order of a song list, simply grab the item (with your cursor) you want to move and drag it to the position in the list you wish it to appear. Then drop it. It is that simple. This is an example of a user moving a comment (about taking a break) inside of the set.

The set builder is very powerful. You can now add instant items such as songs, comments, and notes. You can add details to any item, and specify flow information in details and notes, even specifying if you have specific people doing specific songs. The layout is drag and drop and very quick to edit any field.

In fact, if you are just throwing together a set for an ad hoc event, you can even put this event on the calendar right here on the set builder, but clicking “Add to Calendar” where you can chose to select a previously configured event or simply select a date and one will be auto-created for you.

Try it out!